In my very first forging project, I made a forged machete! It’s rough and rugged but it’s a machete, that’s the point. It was a great exercise in putting my academic knowledge into practice and I can’t wait to do more!
DIY FORGE: https://iliketomakestuff.com/how-to-make-a-simple-propane-forge/
TOOLS & SUPPLIES WE USED(affiliate links):
Devil-Forge: https://www.ebay.com/str/devilforge2014
Ameribrade Belt Sander: https://www.ameribrade.com/shop/ameribrade-272
https://kit.co/iliketomakestuff/making-a-machete-sheath
https://kit.co/iliketomakestuff/my-woodworking-tools
https://kit.co/iliketomakestuff/shop-safety-gear
MUSIC: http://share.epidemicsound.com/iltms
When it comes to blacksmithing, I am by no means and expert or someone to follow step-by-step. I have been inspired by people like Alec Steele, Jimmy Diresta, and Laura Zerra. Blacksmithing is something that I’ve always been interested in, but haven’t actually taken the leap into a project yet. I decided that the farm is the perfect place to start hitting hot metal. Using the DIY Forge that I made, I tried heating a piece of high-carbon steel to the appropriate temperature for forging. I found that my forge couldn’t get hot enough, so I purchased a Devil-Forge, an entry-level forge that works really well!
I heated the piece of steel up to a bright yellow and used a 3lb hammer and an anvil to beat the metal into my machete shape. It took about 45 minutes to achieve my simple rounded shape and I was pretty happy with the hammer marks left in the metal.
Now that I have a rough machete shape from the forging process, I need to refine the shape using grinders and belt sanders. At this point, the metal has been normalized, meaning it has been heated and cooled in several cycles to align the steel structure to a very rigid structure. It hasn’t been quenched or tempered, that’ll come later. Now is the time to hone the shape and add some bevels to the blade before it gets hardened. I really enjoyed this process because I was able to add shape and detail using the sanding tools. The machete started to really take shape and the small details made it look really cool. Before I start the hardening process, I drilled in some holes for the handle pins.
Now that the machete was normalized, shaped, and the bevels were ground in, I could harden the blade by quenching it in oil. I made an oil tank out of PVC pipe and placed the hot blade directly into the oil, hardening the blade. I then used the sanders to clean up the scale and started the tempering process. To temper the blade, I used my powder coating oven to raise the blade up to a certain temperature using a temperature chart to determine that setting and the duration. Once tempered, I gave the machete one final sanding to flatten the sides and to crisp up the cutting edge. The blade is now ready for some handle scales.
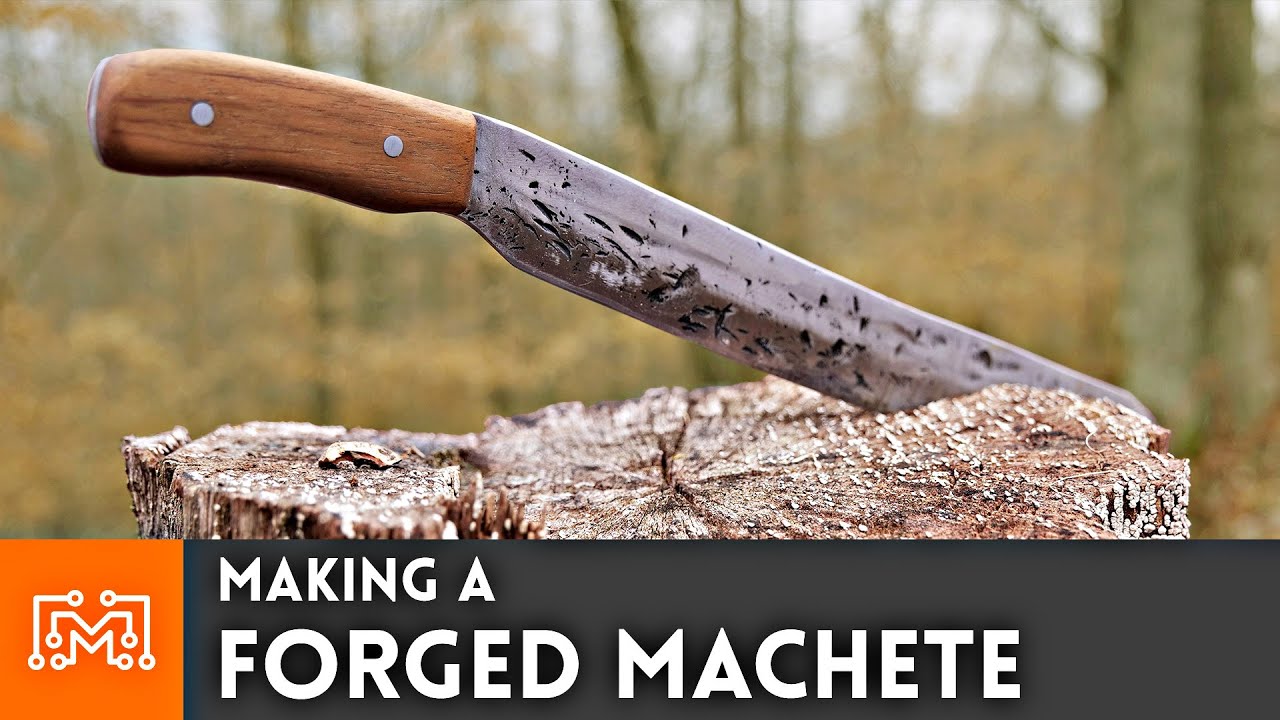
The machete is totally usable as it is right now. Unfortunately, it would be super uncomfortable to use, so we need to make some wooden handle sides, or scales. To do this, I found a scrap piece of teak and traced the handle onto it. Making sure to match up the wood to the handle, I transferred the hole location and drilled through scales. After some epoxy and pinning, the bulky wooden scales were fixed to the machete permanently. To match the contour of my hand, I used the belt sander to round over the wooden scales and even out the surfaces. After a coat of finish, the machete was all done!
The forged machete was a success. I know it may be a little rough and unrefined, but that’s the point of a machete. I chose this project for my first attempt because it is really forgiving. I knew that I would be learning a lot from this initial project, and I absolutely did. I didn’t walk away from this project with all of the correct answers, but I did discover the right questions that I needed to ask. If you’ve followed me for a while, you know that I’m constantly learning and discovering new skills. I don’t claim to be an expert, and this machete is no different. I am so excited to dive deeper into forging and blacksmithing, and now I’m armed with one project and a lot of enthusiasm.
Subscribe: http://bit.ly/ILikeToMakestuffSubscribe
Check out my TopVideos!: http://bit.ly/ILikeToMakeStuffTopVideos
Learn 3d modeling, get digital plans, and cool merch at
https://iliketomakestuff.com
Want to support ILTMS? Get exclusive content and more…
http://www.iliketomakestuff.com/patreon
FOLLOW:
http://instagram.com/iliketomakestuff
http://twitter.com/iliketomakestuff
http://facebook.com/iltms
About I Like To Make Stuff:
We have lots of projects including woodworking, metalworking, electronics, 3D printing, prop making and more!
These videos are our attempt inspire and empower others to make the stuff that they want to have. Hopefully you’ll see something here that will inspire you to make something that you’re passionate about!
I Like To Make Stuff
http://www.youtube.com/Iliketomakestuff
Read More