We needed a new sandbox for the kids, but also wanted to plants some herbs. This planter/sandbox is really simple to make!
For more info check out http://www.iliketomakestuff.com/how-to-make-a-sandboxplanter-combo
First, I had to get rid of my old scrap built sandbox. I dumped out the sand to help level the ground below.
I had the store cut down a sheet of 3/4″ treated plywood to 18″x48″ and 36″x48″
The sandbox is a simple 36″x48″ box, made of 2×6’s. (Cut the pieces to 33″ and 48″)
I connected them together with 3″ decking screws.
Pressure treated wood is so wet that it doesn’t split easily if you don’t pre-drill the holes.
I screwed on the 36″x48″ piece of plywood to the box, using lots of screws. This piece supports the weight of the sand, so attach it well!
For the legs, I cut 8 pieces of decking boards, 24″ each.
These were screwed to the box with shorter screws, so they didn’t poke through into the sandbox.
I tied each corner together by screwing the pieces to each other.
The planter box was built the same way, but with 48″ and 15″ pieces of 2×8.
I screwed on the plywood bottom (18″x48″) as before.
I made and attached the legs for the planter in the same way but only needed two legs. The height of these is the total height of the sandbox plus the height of the planter box.
I drilled a few small holes around the sandbox for drainage.
Luckily, the sandy soil where I live made it easy to level the pieces and line them up.
I connected the two pieces with a few screws through the bottom of the planter.
Since the wood is pressure treated, I lined the inside of the planter with plastic sheeting, stapling it in place.
I trimmed off the excess, leaving it overlapping the top surface of the planter.
I drilled a few more drainage holes.
Using some pressure treated 1×4, I cut a simple frame for both boxes.
They were screwed on with decking screws. Be sure to use more than you think you need, since the pieces overhang the outside of the planter and need extra support.
The sandbox only needed three pieces.
Then I added 8 bags of sand (ouch, my back).
I added a bag and a half of container soil to the planter.
To make it easy to water everything, I added a hose bib. I asked the guy in the plumbing aisle what I needed and he got me the right stuff.
I glued it all together, and attached to the side with pipe straps.
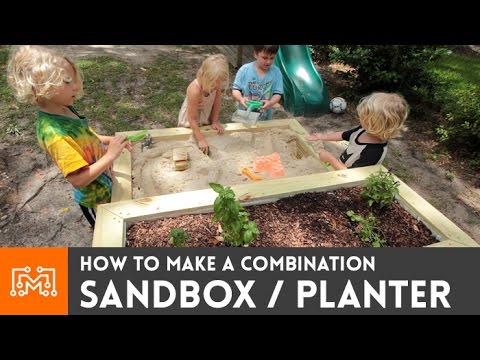
Now we get to enjoy it!!
Subscribe: http://bit.ly/ILikeToMakestuffSubscribe
Check out my TopVideos!: http://bit.ly/ILikeToMakeStuffTopVideos
Learn 3d modeling, get digital plans, and cool merch at
https://iliketomakestuff.com
Want to support ILTMS? Get exclusive content and more…
http://www.iliketomakestuff.com/patreon
FOLLOW:
http://instagram.com/iliketomakestuff
http://twitter.com/iliketomakestuff
http://facebook.com/iltms
#ILikeToMakeStuff
About I Like To Make Stuff:
We have lots of projects including woodworking, metalworking, electronics, 3D printing, prop making and more!
These videos are our attempt inspire and empower others to make the stuff that they want to have. Hopefully you’ll see something here that will inspire you to make something that you’re passionate about!
Sandbox/planter combo // How-to | I Like To Make Stuff
https://www.youtube.com/watch?v=lIzBd-gTtyI
I Like To Make Stuff
http://www.youtube.com/Iliketomakestuff
Read More